Putting Them Together: Pendleton To
Portland
You should be feeling pretty good now about
using NDBs or VORs for navigating around the FS world. Now all you need to do is
to use BOTH of them to get somewhere. Like I stated in the last article, I’ll
use VORs when I have them but NDBs can be helpful to get you nearer some
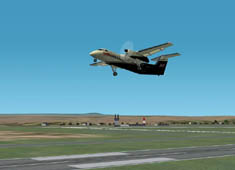
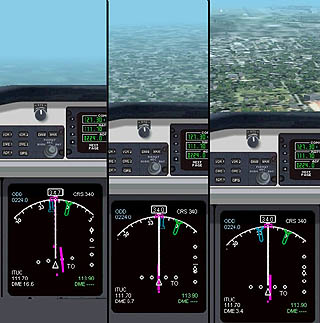
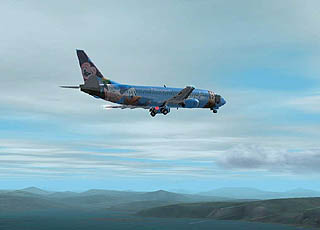
runways. Set NAV1 to 114.70 and turn your CRS setting to 252 degrees. Depart
from Pendleton, OR in any direction (see screenshot A) and as soon as you can,
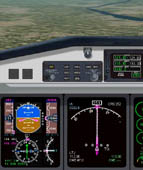
get onto that 252 radial away from town. As you fly along up to 9000 feet retune
NAV1 to 112.30. That arrow should light up right away. (Screenshot B) Continue
on the 252 radial toward that VOR – you’re flying along the Columbia River, also
shown in that last screenshot. Meanwhile, tune your ADF to 332.
Screenshot A
|
|
Screenshot B
|
|
|
At the VOR turn left to 240 degrees. You will
now follow that to the NDB (so watch for that arrow to swing to life) which will
get you set up for landing. When you are clear of some of the gorge terrain,
start your descent down to 3000 feet. I’ll give you a little heads up about what
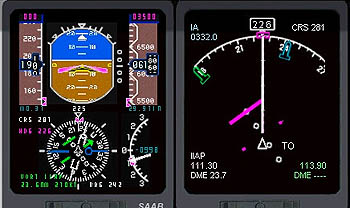
we are doing next. Tune NAV 1 for Portland which is 111.80 and set your CRS to
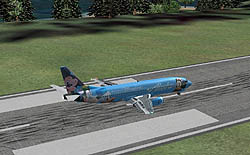
281 (Screenshot D). As you cross the NDB (I hedged myself a little east of the
NDB) turn to 280 degrees, drop to 1500 feet and watch for one of the runway 28’s
(Screenshot E).
Screenshot D
|
|
Screenshot E
|
So again, the NDB set us up for landing but
this time, there was also a VOR to guide us in. If you practiced the skills
learned in Class 101, and have made this flight successfully you are well on
your way to a very successful flightsim career!
Standard Departures And ILS Arrivals:
Portland to Seattle
Now that you are able to get from one place to
the next we need to work on getting in and out in a more orderly fashion. First
we’ll discuss getting out of the airport area using a “Standard Departure.” Many
airports have what they call “Standard Departures” which are paths or corridors
planes need to fly through or on in order to leave the airport area. Some SD’s
are designed for safety – to avoid nearby mountains, while others (like the
River 6 from KPDX) are designed to keep noise out of residential areas. A
Standard Departure will use some type of navigational instrumentation so that
pilots can fly the route consistently in ANY type of weather. Not only is this
safer, it helps air traffic control know where planes are coming from. So, from
Portland, the “River 6” ensures that the sound over Gresham is kept to a
minimum. It also allows the controllers in Seattle to receive or pick up the
planes as they climb out. Like products coming down an assembly line,
controllers can focus on one area of their scopes to watch for planes leaving on
the River 6 SD. From the end of the River 6 SD, ATC can then direct planes
north, south or east towards their respective destinations.
Set your NAV1 to 111.80 (should already be
there from the last landing) and spin your CRS/OBS to 090 degrees. You will see
that the radial or line we need to fly on is to our left (Screenshot F). What
this means is that after we are safely climbing, we need to turn to about 080 or
085 to intercept that 90-degree radial. Then make a right turn back to a heading
of 090. (Screenshot G) Climb out on 090 until your DME reads 6 miles, then turn
left to 360 degrees and head north, (Screenshot H) climbing on up to what we’ve
been using for this tutorial, 9000 feet.
Screenshot F
|
|
Screenshot G
|
|
|
From here you kind of know what to do so set
"Otto" to hold you steady and look out the windows at Mt. St. Helens volcano!
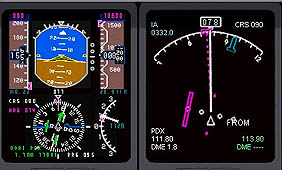
Okay, enough sight-seeing…back to work. Tune
NAV2 (if you have that) for Seattle at 116.80 and turn toward that arrow’s
heading. In the panel shown I didn’t have a NAV2 so I set NAV1 for Seattle and
flew north until I intercepted the 330 radial inbound (Screenshot I). I took
that down to 30 miles DME. Then, I tuned the ADF to 224. Next, tune NAV1 to
111.70 and set your course (CRS) for 341. Now, one more thing…in your weather
menu, set visibility down to only 5 miles!
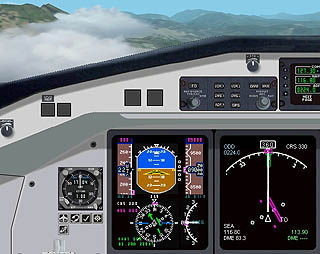
Screenshot I
|
|
|
ILS: Arriving into Sea-Tac:
Having talked about Standard Departures, we’ll
talk about Instrument Approaches. Much like VORs, some runways have a radio beam
that travels outward and upward from the end of the runway. Called an
“Instrument Landing System”, an ILS directs planes to the end of the runway in
any kind of weather. Now, with weather at only 5 miles, it’s time to put that to
good use.
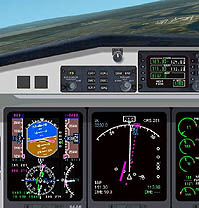
Drop down to 3500 feet and continue to follow
that arrow toward the NDB. Somewhere about 26 miles out your main instrument
(Called an H.S.I. by the way, for Horizontal Situation Indicator) will come to
life. Mine looked like Screenshot K.
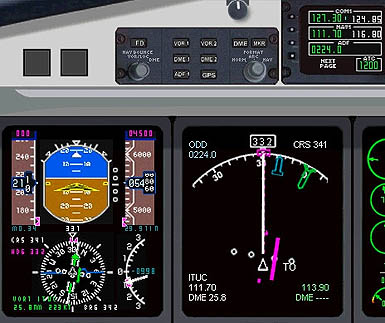
Screenshot K
|
|
Screenshot L
|
Here’s the deal with an ILS approach. The
vertical “broken arrow” line indicates where the runway’s centerline is…right of
us in this example. So first job is to get lined up on that sucker! Make a
little right turn to get centered up. Next, look for that arrow or diamond or
triangle along the right side of your H.S.I. That arrow is above you and tracks
a line down to the end of the runway. As that arrow comes down to the middle,
you need to slow up a bit and start downward. (Watch the progression in
Screenshot L – can you see the runway in the last slide?) If you are coming down
too fast you get too low and that arrow creeps back up…too shallow a descent and
the arrow gets below you. Keep that thing centered! Small but quick corrections
are helpful here! (In fact, now might be a good time to pause the sim and go
back and read my
ILS tutorial)
This is TOUGH STUFF and takes a LOT of practice so hang with it. This is where
real pilots make the big bucks! Good luck.
GPS Mode – FMC Programming – Autopilot Use:
Seattle to Ketchikan:
Flying the plane by hand, dialing radio
frequencies, turning here and there is all pretty tough to do…even harder to do
smoothly. (That’s another reason why real pilots get the big bucks isn’t it?) On
a good FMC pilots can enter in their waypoints as well as altitude and speed
restrictions. They can program things to fly the shortest route, the fastest
route, the most economical route, etc. The computers are pretty smart and can
calculate fuel burn, time to arrival, what you’ll have for lunch and what order
your bags will come off the carousel…well, not really ALL THAT but you get the
idea. Since airlines are in the business of efficiency and passengers are
interested in a smooth flight, without a lot of weaving to and fro, flying under
the control of the FMC is the best way to ensure that everyone is “happy.” (I
spoke with a pilot who flies regularly and he estimates that he’ll get 5 minutes
of hands-on, in-the-air, time each flight. And the co-pilot gets about 20% of
the flights so…) There are many great panels out there that incorporate some
forms of FMC but that requires its own tutorial and I’m not the guy to write
that. So for us more simple pilots there is the default flight planner! We can
use this tool to sort of, in a lame fashion, mimic an FMC. I’ll show you how
next:
Screenshot M
|
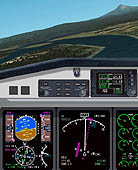
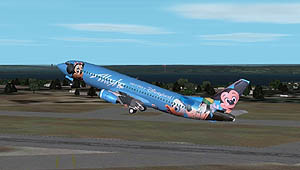
For this next part I switched into an Alaska
Airlines 737 using the default panel. (Screenshot M) Go into your default flight
planner and select Seattle, Washington (KSEA) as departure and Ketchikan, Alaska
(PAKT) as your destination. Choose IFR and GPS-direct functions, then, FIND
ROUTE. Next, you don’t want to just fly directly there as that’s hardly any fun,
so while that route is up on the map view screen, move the view and drag the red
route line over the following waypoints:
	The PA NDB (396)
	The YVR VOR (115.90)
	The YZT VOR (112.0)
	The PR NDB (218)
	The ANN VOR (117.1)
	The AKW NDB (229)
This will give you a 717.3-mile, very scenic,
route into southern Alaska. Save the flight (“FMC.PLN” or something) and then
load the flight.
Now, you should be in a 737 with the default
panel, somewhere at Sea-Tac. For my example, I was parked up at the end of the
runway, ready for a south departure. Look near the autopilot set-up for a little
switch labeled NAV / GPS and click that over to GPS. That tells the instruments
to follow the Computer-Programmed route (or FMC for our purposes). Before you
start your takeoff roll you can set your altimeter and speed settings too if
you’d like but DO NOT turn on any switches or the Flight Director yet (some say
you can, some say you can’t…I’ve had mixed results so I leave mine off for now).
Another word of caution or disclaimer here –
Flying in this fashion is really not FLYING at all! If this is the extent of
your simming than you either do not have a yoke/stick to fly with or you may be
a very, very sad person. For me…I have a real life outside of flight simming and
if I choose to “fly” in the following manner it’s because I have to help with
dinner or the house or the kids or the dog or run some other domestic errands. A
real life should not keep you from simming and simming CERTAINLY should not keep
you from living a full and eventful life outside of your computer box! (Enough
soap-box I think!)
Screenshot N
|
|
Screenshot O
|
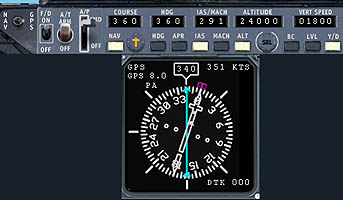
Throttle up, steer down the runway, rotate off
smoothly, retract the gear and engage Otto. At this point I turn on AP/Master –
ALT – SPD – NAV (this one flies the plane along the route you have programmed
into the “FMC” – not really an FMC but for us beginners it works, okay?) and YD
(that's five buttons lit up). Screenshot N shows the AP all fired up, the plane
is flying itself now, and the H.S.I. shows the blue line pointing to my route –
I’ve 8 miles to go. At this point you are welcomed to disconnect Otto and
hand-fly the plane along the route pointed out by the blue line, that’s fun!
(Screenshot O)
Screenshot P
|
|

Screenshot Q
|
If you are not hand-flying, you are free to go
wash the dishes or vacuum out the wife’s car because your input is done. Many
pilots fly this way because it’s so darn easy. Smooth for the passengers, yes,
but not very much fun! The point here is that I want to show you that this
default flight planner with NAV-GPS tracking can sort of act like a big old
complicated FMC in that it can fly the plane for you, to exactly where you told
it to go. Now, if weather changes or if ATC sends you off somewhere else or if
you set the route to come in over some big mountain, our little default system
will fly you right into that mountain so it’s by no means perfect – sort of a
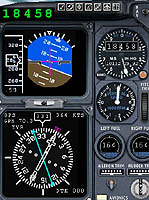
“poor man’s FMC.” However, if you set in the route I have described above, you
will be nicely arranged (after turning over the AKW NDB) for the ILS into PAKT
runway 11 (Screenshot P). All you have to do is set NAV1 to 109.30, set ADF to
396, switch the NAV / GPS back to NAV, turn HDG to 050 and engage that (HDG)
button, and turn CRS to 110 degrees (Screenshot Q).
|
So now, we’ve covered NDBs and VORs in
Class 101.
We’ve covered Standard Departures, ILS approaches and NAV-GPS tracking in this
segment (Screenshot R). I hope that this provides enough of a basic introduction
to get you all into the air safely. Good luck to you!


